Tutorial 1 · about 20 minutes
Turn “I keep skipping this” into a plan you will actually follow
A StudyLoop plan is one Markdown file you can read and edit. It starts from a reason, not a syllabus: if you cannot say what changes once you have learned the thing, the plan has nothing to check progress against.
1. Write the whole plan in one command
One command, because plan new creates a plan rather than adding to one. Running it twice gives you two half-plans, and neither can be activated. Anything you leave out is recorded as blank rather than invented.
studyloop plan new \
  --title "Python Decorators" \
  --why "Decorators keep appearing in the codebases I read, and I skip them." \
  --topic python-decorators \
  --success "I can explain what @functools.wraps preserves, without looking it up" \
  --success "I can write a decorator that takes an argument" \
  --constraint "30 minutes a day, most days" \
  --milestone "Read and explain a decorator someone else wrote (concepts: closures, first-class functions)" \
  --milestone "Write a timing decorator from scratch (concepts: functools.wraps)" \
  --milestone "Write a decorator that takes arguments (concepts: decorator factories)" \
  --milestone "Explain the difference to someone else (concepts: teach-back)" \
  --activate
Milestones should each be finishable in one sitting. One that takes a week gives you no signal for six days. Naming the concepts each one exercises keeps the plan readable and gives you the words to record progress against in step 3 — which is what spaced review and the mastery graph actually read.
--activate is refused if the plan is missing a mission, success criteria or milestones — an unevaluable plan must not look active. Either way the command prints the plan’s id and file path, then a readiness report of what still blocks activation and what would merely improve the plan:
Created python-decorators → ~/.local/share/studyloop/study-plans/python-decorators.md
Ready to activate.
  • No target date set
Copy the id from that first line — every command below is written with <plan-id> where it goes, and you substitute what plan new printed. The id is derived from the title and made unique, so if you already have a plan called something similar it will not be the slug you expected, and using the example verbatim would edit the wrong plan.
2. Look at it in the Web UI
If you followed Getting started, the installer has already set up the Web UI. Keep its local server running:
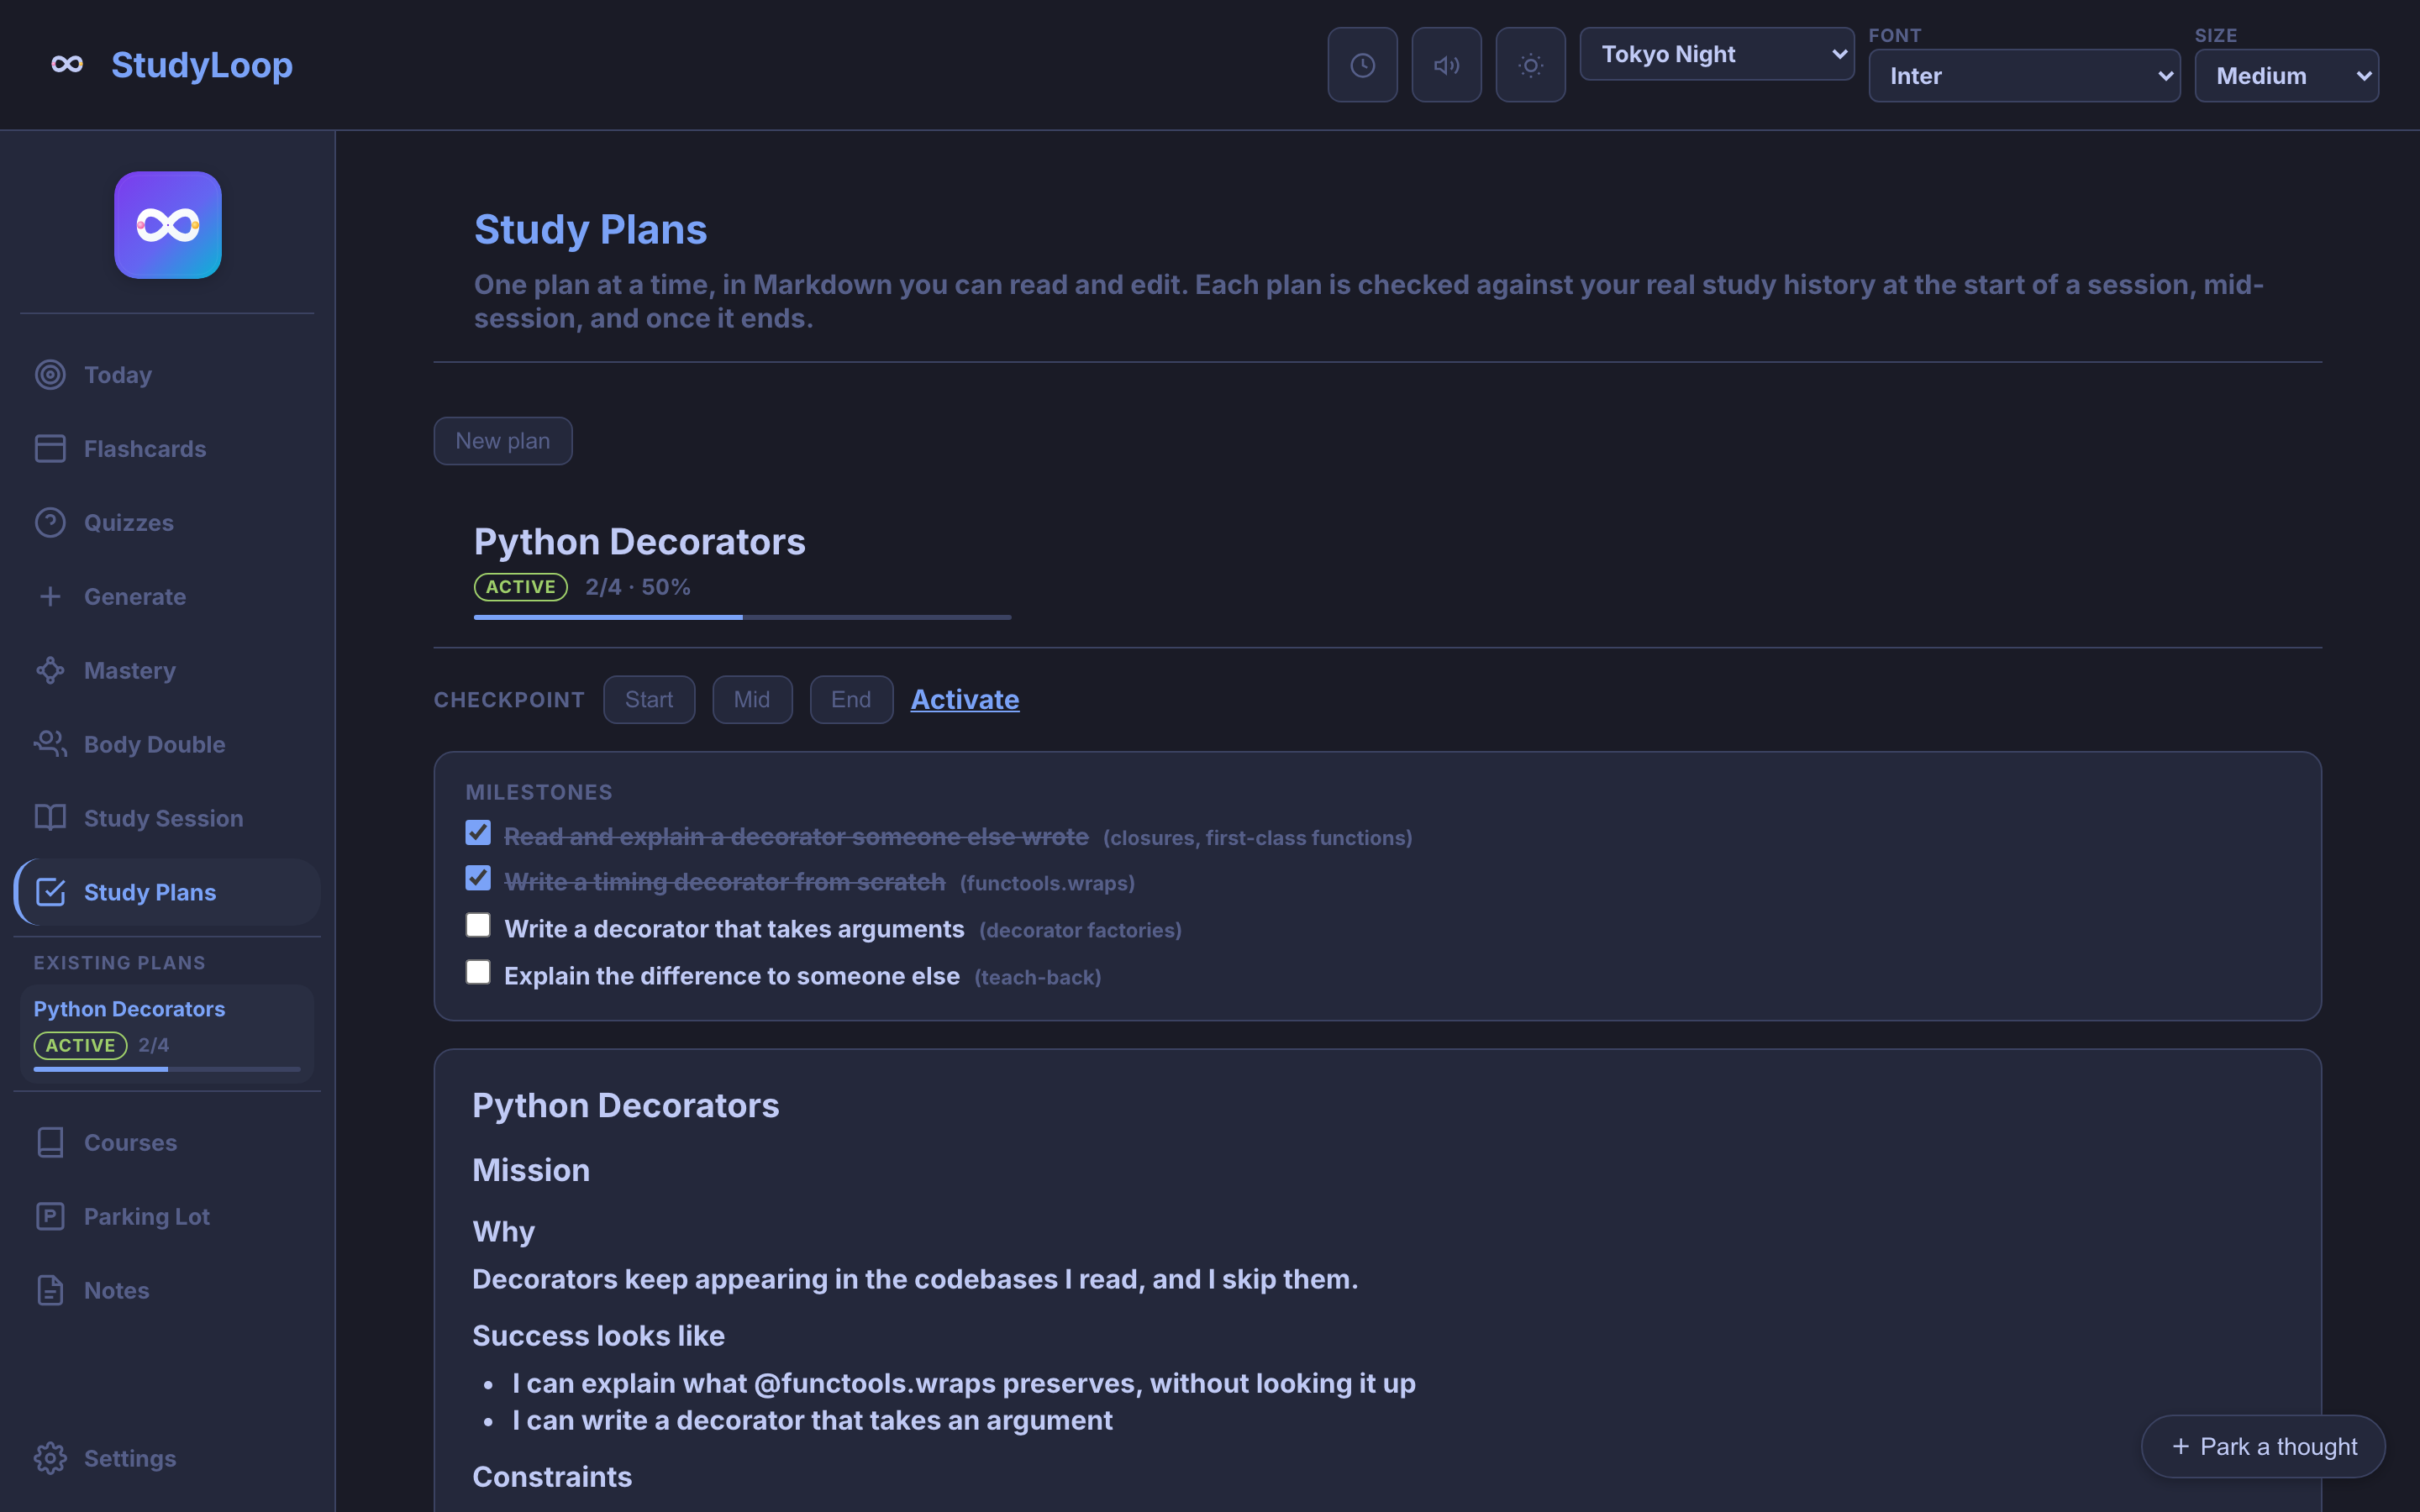
studyloop webOpen Study Plans and choose the plan. The progress bar counts completed milestones; the document below it is the same Markdown on your disk.
3. Study against it, then record what actually happened
Milestone indexes start at 0, in the order they appear in the plan. Use --done rather than the bare toggle, so re-running the command cannot undo it.
studyloop study "Python Decorators" --energy 6

# Afterwards, say what landed and what did not:
studyloop progress "functools.wraps" --topic python-decorators --confidence learning
studyloop progress "decorator factories" --topic python-decorators --confidence struggling
studyloop plan milestone <plan-id> 1 --done
Use the same topic string here as in --topic above. Confidence levels are the input to everything downstream: recording struggling honestly is what makes tomorrow’s suggestion useful, and recording mastered because it feels better is how a study tool starts lying to you.
4. What Today looks like once there is evidence
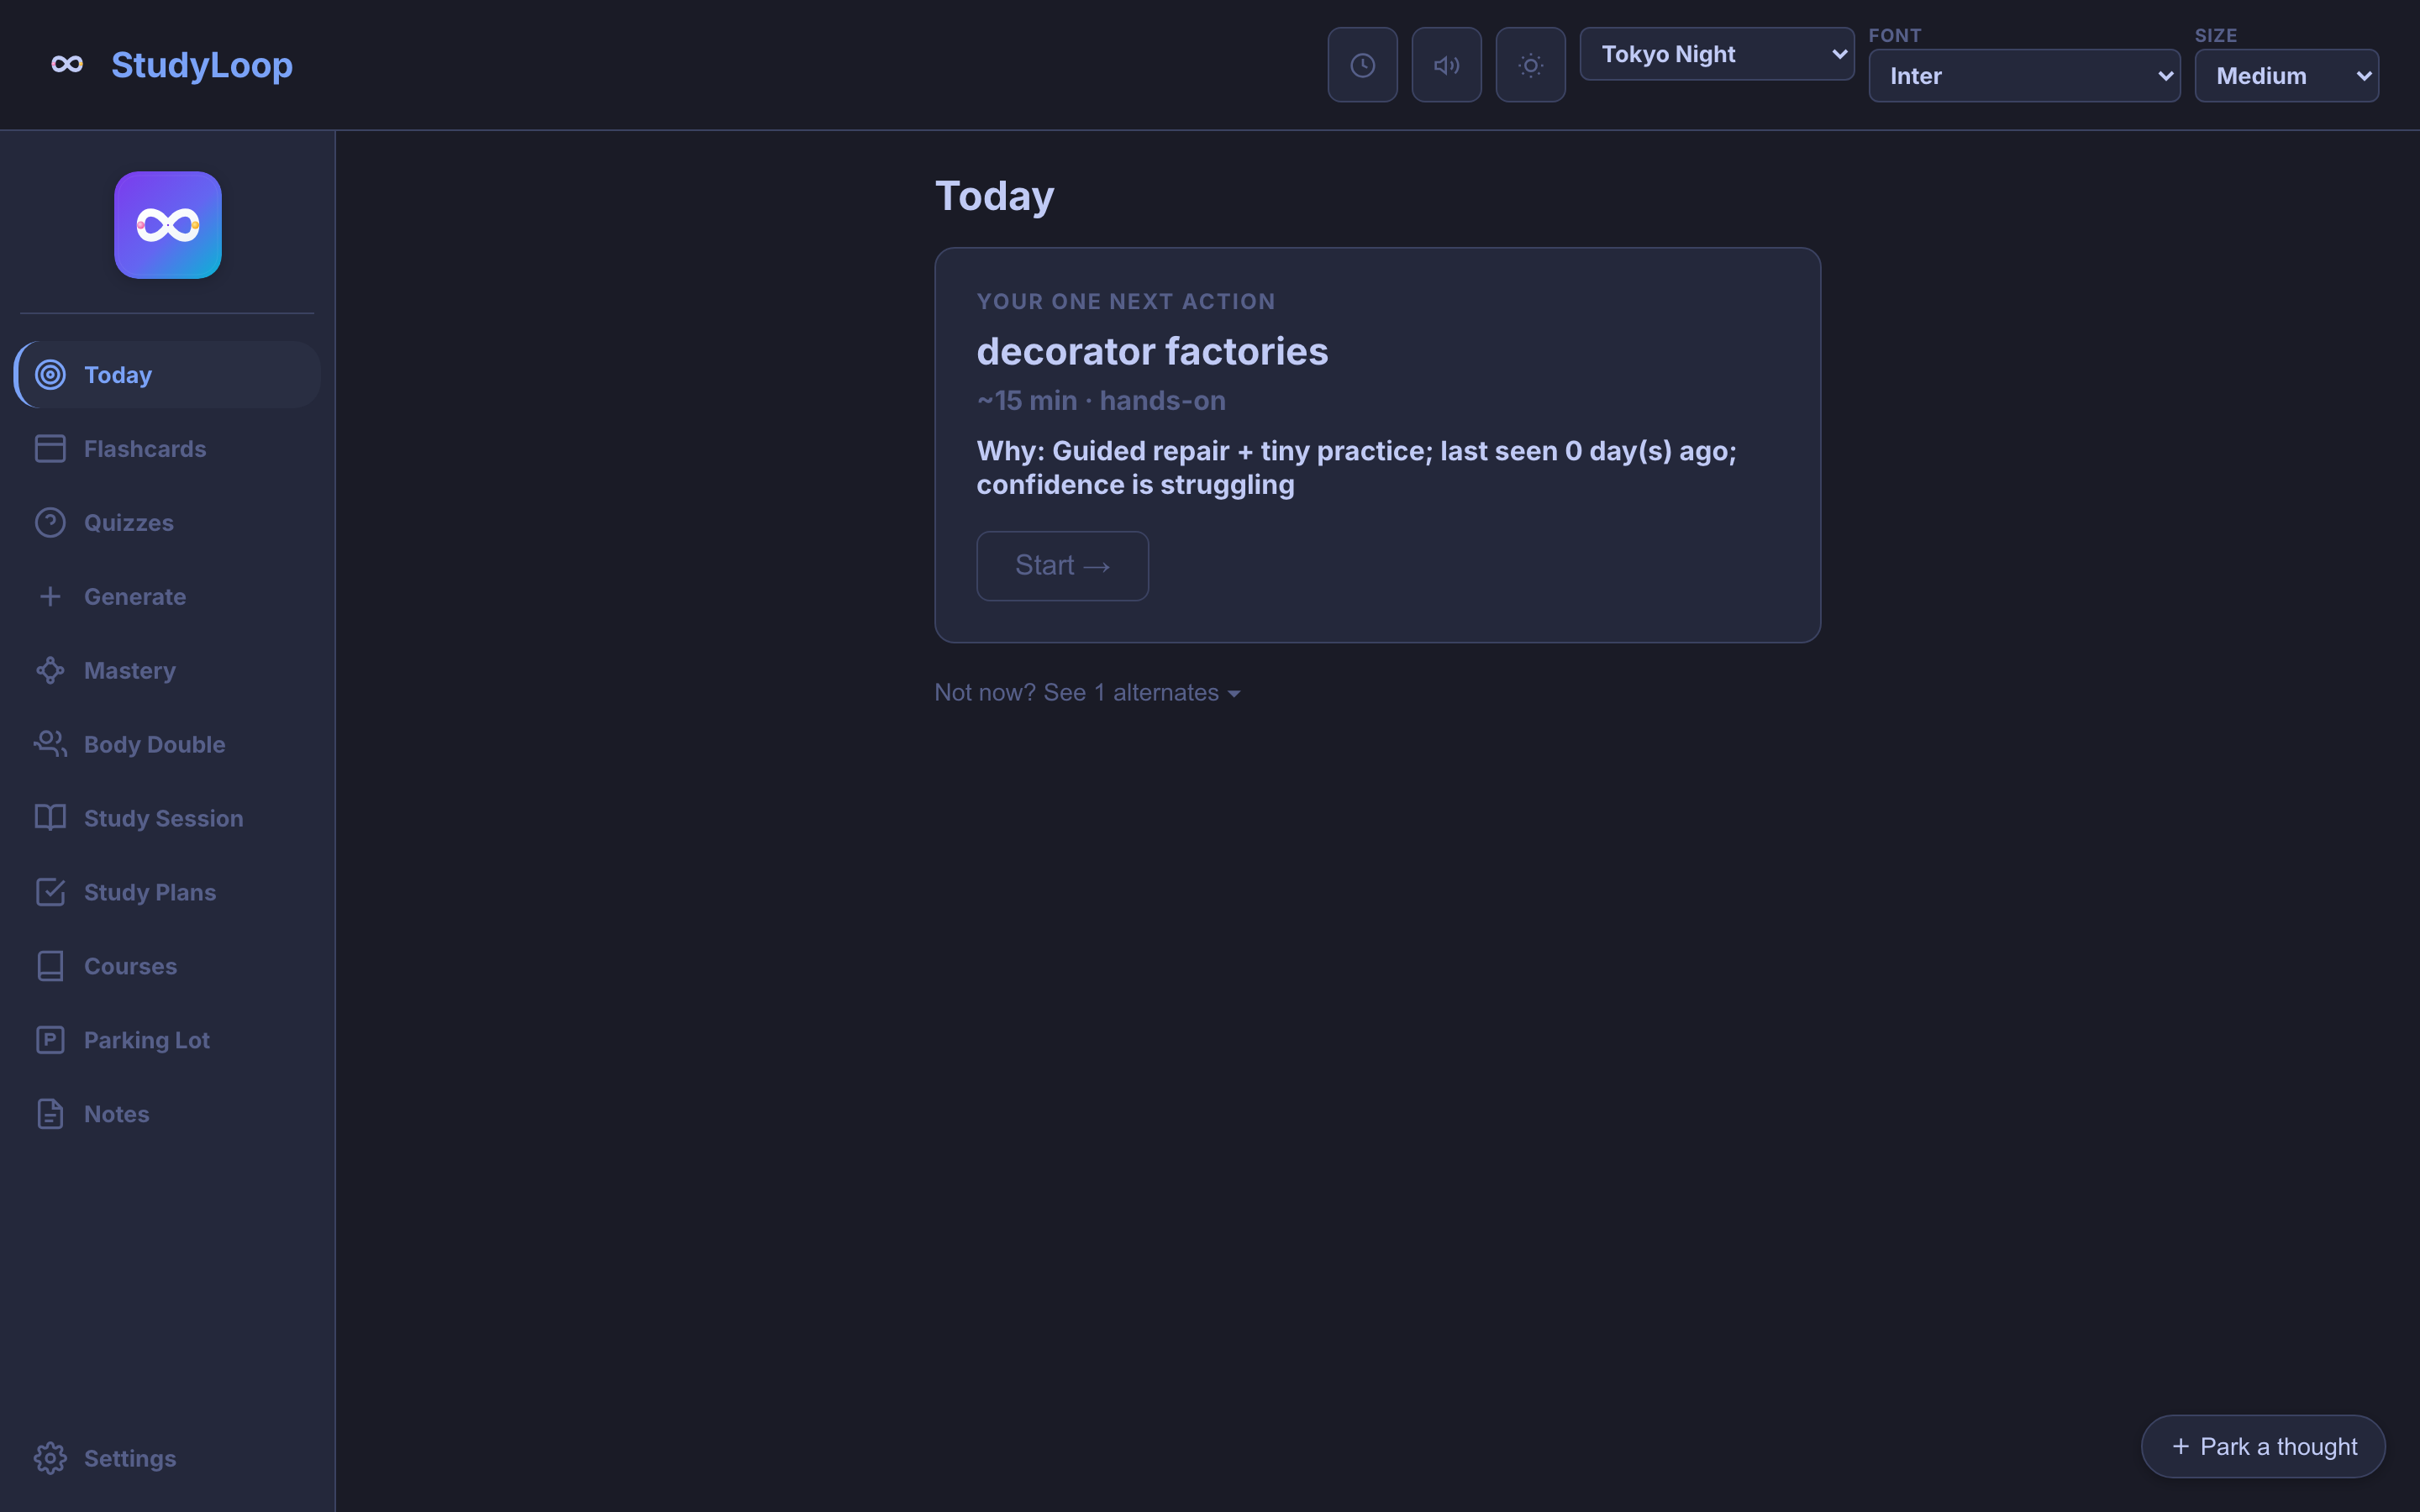
Today proposes exactly one next action and shows its reasoning, so you can choose whether it fits. It uses recorded study evidence across your history, not the active plan’s next milestone.
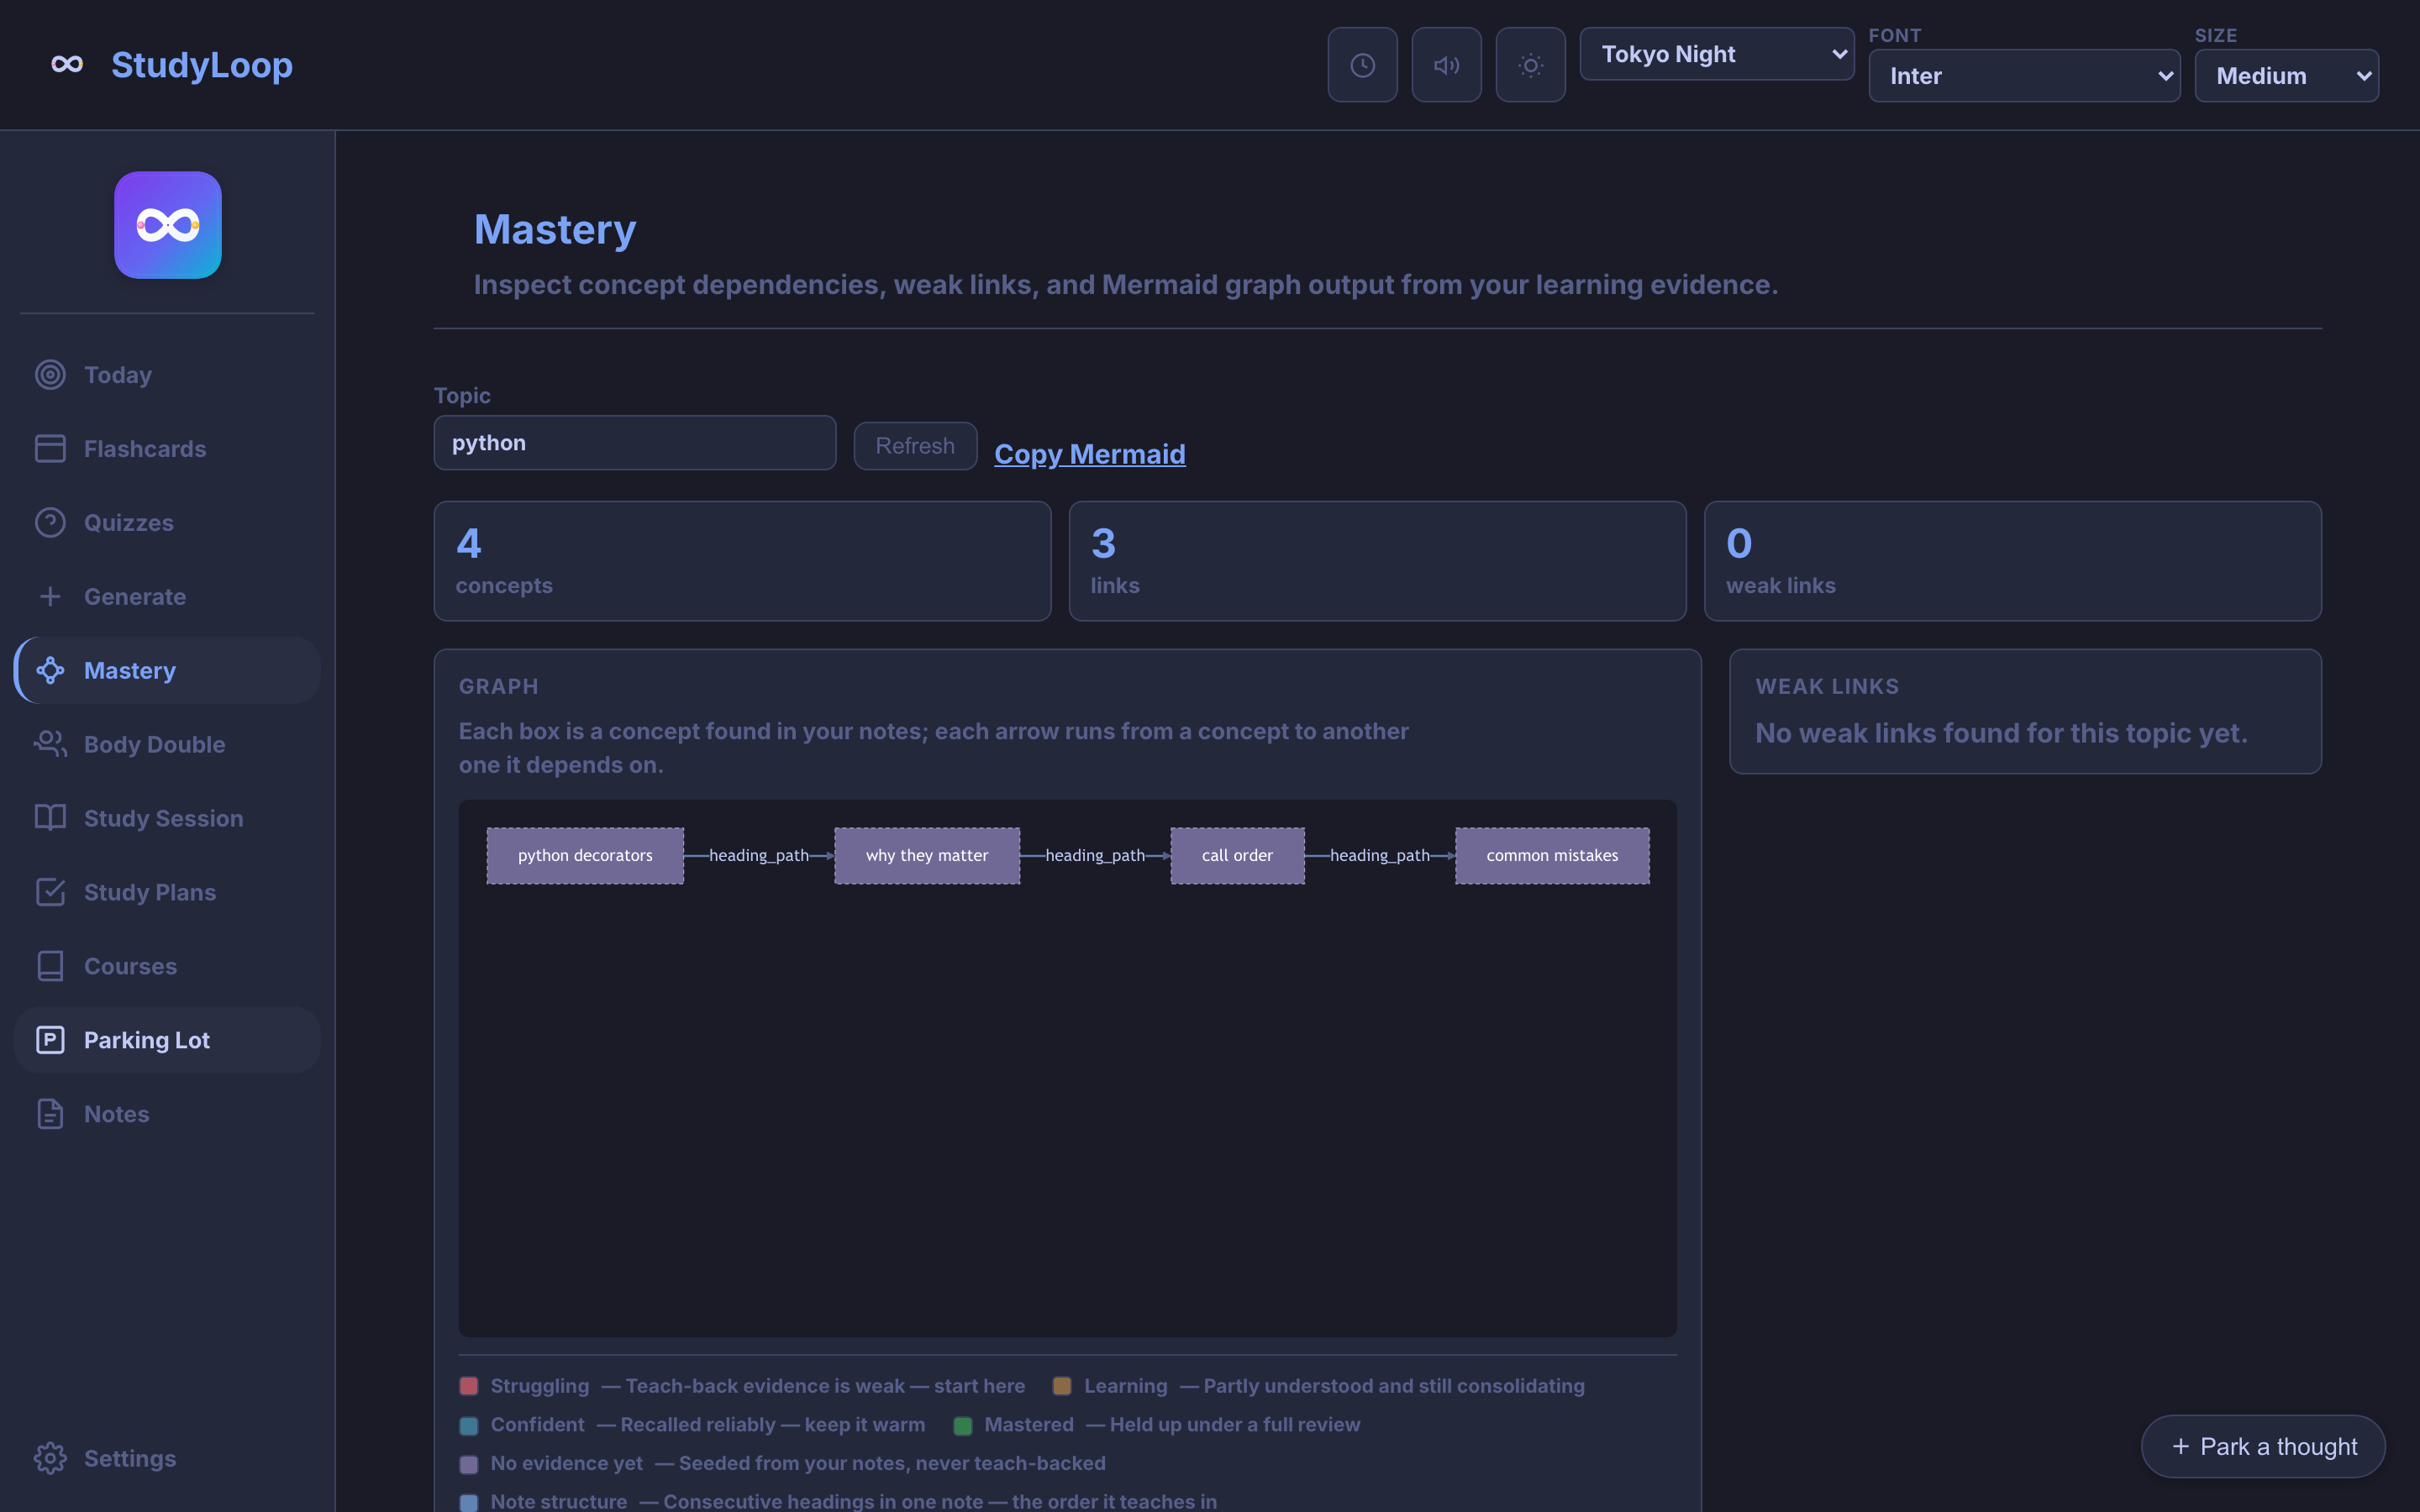
Mastery draws the concepts it can see and marks the weak ones. It reads two things: the confidence you record, and the heading structure of course notes you have pointed StudyLoop at.
Tutorial 2 · about 10 minutes
Put the plan where you already read — Obsidian
The second-brain layer publishes a view of the plan into your vault. The plan Markdown stays the only source of truth: nothing StudyLoop writes into Obsidian is ever read back as authority, and nothing is written anywhere until you turn it on.
- Point StudyLoop at a vault
studyloop brain enable obsidian --vault ~/MyVaultA missing folder is refused unless you add --create. - See what it would write
studyloop brain publish --dry-runLists every file, writes nothing. - Notes appear in your vault
studyloop brain publishToday's note plus every active plan. - Read it in ObsidianStudy/Today.md and Study/Plans/<plan-id>.md
- Write in your own fileStudy/Plans/<plan-id>.notes.md is yours. StudyLoop never writes it.
- Your notes come back to you
studyloop brain pull <plan-id>Not to the plan. You decide what belongs in it.
1. Point StudyLoop at a vault
studyloop brain enable obsidian --vault ~/Documents/MyVault
studyloop brain status
A vault path that does not exist is refused unless you add --create. StudyLoop will not guess a vault: guessing means writing files into a folder you did not choose.
2. Look before it writes
studyloop brain publish --dry-runThe dry run lists the exact vault-relative files it would create, the ones it would leave unchanged, and any it would refuse — and writes nothing. Run it once so the first real publish holds no surprises.
3. Publish
studyloop brain publishWith no selector that publishes today’s note plus every active plan. A plan with no learning records yet gives you two files:
Study/
├── Today.md
└── Plans/
    └── python-decorators.md
A Learning Records/python-decorators/LR-0001.md appears once the plan has a learning record to project. The sibling Plans/python-decorators.notes.md is yours and StudyLoop never creates it — make it yourself when you have something to write there.
Each file StudyLoop owns carries a studyloop: block in its frontmatter. That marker is what makes the next publish safe: a file without it is never overwritten, so a note you wrote by hand at the same path stops the publish with a message instead of disappearing.
4. Run it again and watch nothing happen
studyloop brain publish
# Study/Plans/python-decorators.md — unchanged
Republishing an unchanged plan writes no bytes and leaves the modification time alone, so your vault’s sync and its “recently changed” list stay meaningful.
5. Write your own notes beside it, then pull them back
Thoughts you have while reading the projection belong in that .notes.md file. StudyLoop reads it only when you ask, and “nothing there yet” is a normal answer rather than an error.
studyloop brain pull <plan-id>

# Then decide, deliberately, what belongs in the plan itself.
studyloop plan show <plan-id> --markdown
Milestones and lifecycle have commands — studyloop plan milestone and studyloop plan status. Changing the mission or the success criteria means editing the plan document, which lives in the directory studyloop plan path prints. Edit that file, not the projection.
Study/Plans/python-decorators.md is replaced on the next publish, with a warning naming the file. That is the cost of having one source of truth, and it is why the .notes.md file exists.Tutorial 3 · about 15 minutes
Put your plan into xTiles through your assistant
StudyLoop has no xTiles client. What it has instead is an understanding of the boundary: your assistant already holds your xTiles connection, so StudyLoop hands it the words and stays out of the way. StudyLoop stores no xTiles credential.
xtiles server from your assistant’s own MCP settings rather than with a StudyLoop command.- Record the choice
studyloop brain enable xtilesNo vault, no path, no credential. Stays on your machine. - Install the wind-down skill
studyloop install agentsSilent unless the provider is xtiles and an xtiles server is connected. - Attach the connector, and authorise it
claude mcp add --transport http xtiles …Setup traffic: this reaches xTiles to sign in. No study content yet. - You run one of the three promptsNo study content has left your machine until this moment.
- Your study content crossesWhatever that prompt includes or fetches — to the model service, then xTiles.
- You open xTiles and see itStudyLoop cannot see what was sent, and cannot verify what arrived.
1. Attach the xTiles connector to your assistant
You need an xTiles account and an assistant that supports remote MCP servers. There is no API key to copy or store — one URL, then one browser authorisation:
claude mcp add --transport http xtiles https://mcp.xtiles.app/mcpThen run /mcp inside Claude Code and sign in to xTiles. Tool names appear only after you have signed in. This tutorial is written for Claude Code. The repository’s recorded end-to-end check used Kiro CLI 2.21.0 with an xTiles Plus account on 4 September 2026, not Claude Code. Other harnesses are not established by that check.
You also need StudyLoop’s own MCP server attached, because the first prompt below calls get_next_action and get_due_cards through it. The second prompt needs only the Markdown you paste in. See the MCP guide for that half.
2. Tell StudyLoop that xTiles is where you think
studyloop brain enable xtiles
studyloop brain status
brain publish then exits quietly with nothing written — deliberately, not as an error. A wind-down routine can call it every session without producing a failure the learner cannot fix.
3. Install the wind-down skill once
studyloop install agentsThe skill is installed once into ~/.agents/skills/ and symlinked into each assistant that documents a skills directory, so there is one file to read and one file to update. It stays silent unless your provider is xtiles and an xTiles server is actually connected in that session.
4. Start with one visible planner tile
This is the shape checked in the live workflow. The recommendation and due cards come from your whole study state, not just one plan. Check xTiles’ current account limits before using its connector.
Using the StudyLoop tools, call get_next_action with energy "medium",
time_minutes 25 and modality "recall", and get_due_cards with limit 20.
Then, in xTiles, add ONE tile built from Markdown to today's planner titled
"Study: <primary concept>" with the recommendation's reason and estimated
minutes, and a checklist of the due reviews, one line per card
and at most 20. Do not create a project. Ask me before writing if the
planner already has a "Study:" tile today. Return the page URL so I can
check that the tile is visible.
5. Optionally, copy the plan into a project
No MCP tool returns plan Markdown, so this one you paste in from the CLI:
studyloop plan show <plan-id> --markdownHere is my StudyLoop plan as Markdown. Ask before writing to xTiles.
Create or refresh a normal text page in the project "<plan title>" with
the mission, milestones as a checklist, and learning records below them.
Do not create a board or collection. Do not delete anything.
Tell me what changed and how to find the page in the interface.Name the project exactly the same way every time. A renamed project is a project the prompt cannot find, so the next run makes a second one.
6. Check the result in xTiles
The connector cannot create a board view or refresh collection pages. In the recorded check, some created pages were not visible from the project home. The simpler text-page prompt above is a suggested alternative, not a validated end-to-end workflow. Confirm the page is visible before relying on it. Editing permissions also depend on your xTiles plan. Pages and projects need manual deletion in the xTiles UI.
7. Decide what stays authoritative
What lands in xTiles is whatever your assistant sent. StudyLoop cannot see it and cannot verify it, and says so rather than implying otherwise. Treat the xTiles project as a view, and keep the plan itself as the thing you change.